I made them with Japanese cotton and linen fabrics. I put low profile batting in the body and stuffing in the center circle.
This is the way how I made them.
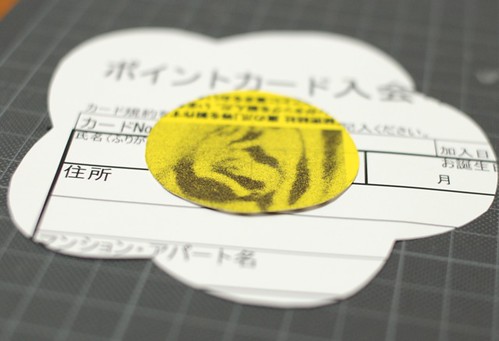
At first, I made two patterns for flower and the center circle.

The flower measures approx. 4.5 inches square. I usually handwrite patterns on recycled paper(* v *). The center circle pattern should be with thick paper to make the applique better.

I cut the fabrics as the patterns plus 0.5 inches allowance. One circle, two flowers and a batting as the size of the flower(I cut it roughly).
Make the center circle.

Sew the edge line roughly with running stitch. And put the circle pattern on it and pull the thread.

Make the circle shape and iron it. Then, remove the pattern.

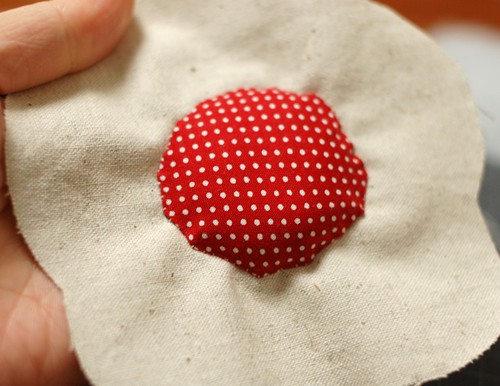
Put the circle on the linen fabric and sew them together using blind stitch leaving a space to put stuffing.

I left 1-1.25 inches space.

Put the stuffing from the opening.

Close the opening using blind stitch. I'm sorry but I put too much stuffing in this and I cannot put my cup on the coaster stable. So I took away some stuffing after.

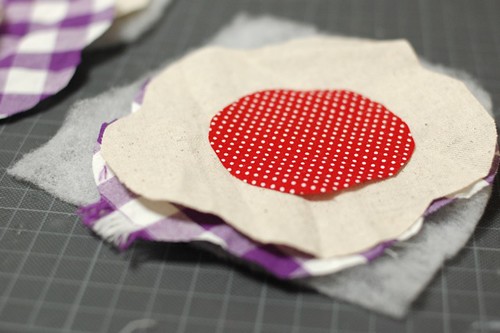
Put them like the picture, batting, top fabric(making the right side up) and the under fabric(making the right side downward).

Then sew the pattern line leaving 1.5 inches space to turn it out. And cut a little the five pitted areas(See the picture).


Turn it out.

And close the opening with blind stitch.

Stitch on it with Sashiko cotton embroidery thread. It's a thick thread so I used only one thread. I used running stitch around the circle.

And I used whipstitch on the edge.
I finished it!

Now I know I cannot put too much stuffing in the center circle (* v *).
I made these charms too. They are the petit gifts for my customers.

Have a good weekend (* v *)!!!!
These are so cute. The charms will be cooed over I am sure..
ReplyDeleteYou are so generous to give a tutorial on your lovely creations. I would love to make some of these for my friends for Christmas.
ReplyDeleteBeautiful as always!! I linked to your tutorial on Craft Gossip Sewing:
ReplyDeletehttp://sewing.craftgossip.com/tutorial-handstitched-flower-coasters/2009/12/12/
--Anne
my daughter, 5, is named Hana. i will make some of these for her play kitchen. thank you!
ReplyDeleteHi
ReplyDeleteI'm Monica to Milan Italy
december 16 Il make a post about your tutorial in my blog.
Bye
Moni
What lovely little flowers and charms. Making your own patterns is a real talent.
ReplyDeleteThis is such a lovely tutorial
ReplyDeleteThank you for sharing! I admire your stitching skills!
Love these Mai! You are so very creative. Thank you for sharing.
ReplyDeleteThis comment has been removed by the author.
ReplyDeleteThis comment has been removed by the author.
ReplyDeleteThis comment has been removed by the author.
ReplyDeleteThis comment has been removed by the author.
ReplyDeleteThis comment has been removed by the author.
ReplyDeleteThis comment has been removed by the author.
ReplyDeleteVery nice! I love your tutorials. Thank you!
ReplyDeletehi...........
ReplyDeleteWow love the tea coasters.......
I'm ur big fan.....i love your work
Thanx for sharing
Good idea Mai.
ReplyDeleteI'll will try them, as they're small projects :)
All the best for the new year
Mena :)
Thank you Mai for this great tutorial! It was very easy to follow and fun to make!
ReplyDeleteDear friend.
ReplyDeleteI am Spanish and I see your blog for a long time. I want to send some Spanish fabrics for your design, as proof of my friendship.
If you wish to receive them can you send your address to my e-mail: marti1mart2@gmail.com
hello, your blog so nice, i like this...
ReplyDeleteobat keputihan
Awww! These are so cute!! :D I'm going to give them a try sometime.
ReplyDeleteThank you for sharing to us.there are many person searching about that now they will find enough resources by your post.I would like to join your blog anyway so please continue sharing with us
ReplyDelete