With this recipe, you can make a bow with a very simple Kogin embroidery.
This is a very simple, easy pattern.
For one bow, you need these items.
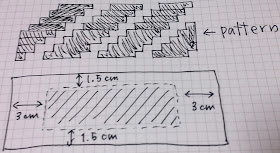
1. a piece of 13cm x 6cm embroidery cloth, AIDA etc.
I use 18ct cotton cloth for cross stitch.
2. Embroidery thread. I use it for Kogin, but you can use DMC No. 25 embroidery thread also.
3. Needles for cross stitch.
That's all. Let's start.
- Start from the center line. Leave 3cm from the right edge, sew a line.
- When you finished one line, go to next one. For this pattern, you only have to count 4, 2, 4, 2, ...
- When you finish one thread, put the rest through the sewed line and cut it.
- When you finished Kogin embroidery, make the bow shape. At first, fold the upper and below edge.
- Then fold the side edges to the center, and sew it.
- Then, tie the center.
- Tie the center again with the embroidery thread.
- Put a pin on the back for a brooch, or hair elastic for a pony.
This is a very simple and easy recipe.
I'm happy if you want to try it.


Excellent tutorial! Thank you very much for sharing. :-)
ReplyDelete♥
ReplyDeleteThank you so much for sharing! I was so curious about it after you showed us your kogin embroidery in December. Now I can try too!
ReplyDelete