Today I'd like to show you the way to make a drawstring bag from square.
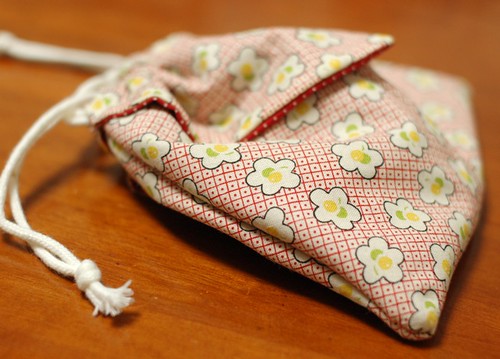
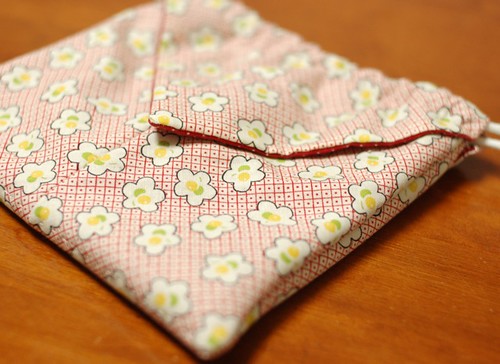
This is the bag.
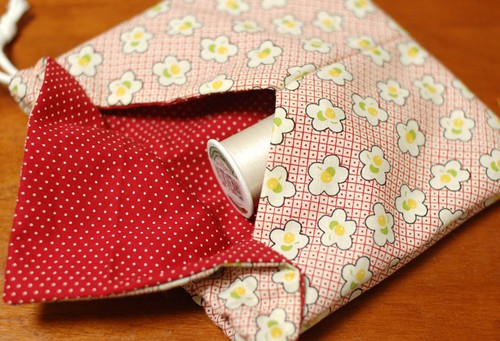
It has two pockets on the outside with flaps.
If you have a hanky, you can make the bag from it.
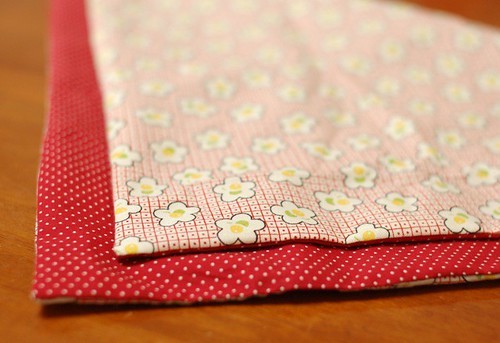
I didn't have any to use, so I used two pieces of squares for it.
Here we go.
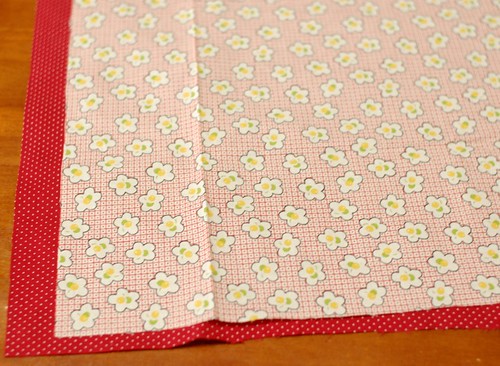
I cut each fabric in 16 inches square. From them, I made approx. 6.5 inches square pouch.
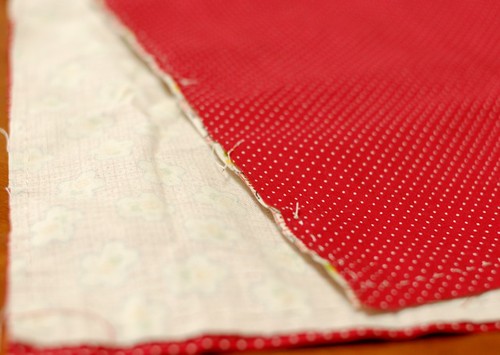
I sewed them together leaving the space to turn it out.
I turned it out and closed the space. If you make it with your hanky, please begin from the next step.

Fold it into a triangle, and fold the top at the 1/3 from the top. (See the picture)

Mark the line and put pins.
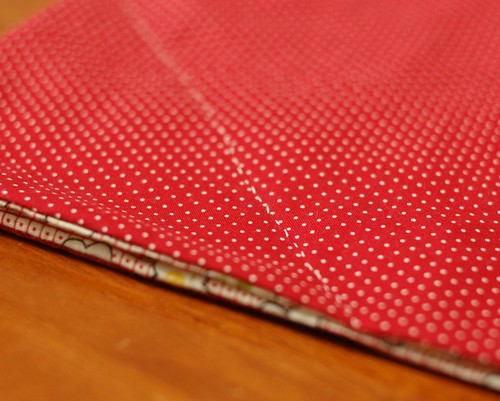
Then sew at the line.

After you sewed it, you can open the top like the picture. Place the sewed line at the center.
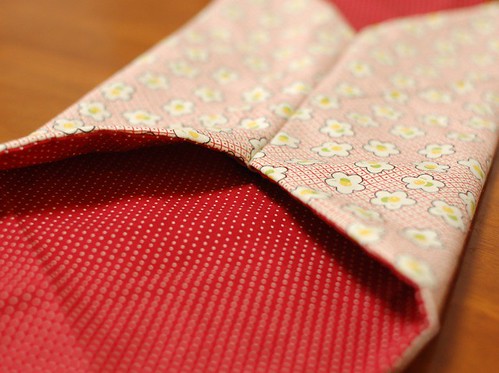
Then turn it out.
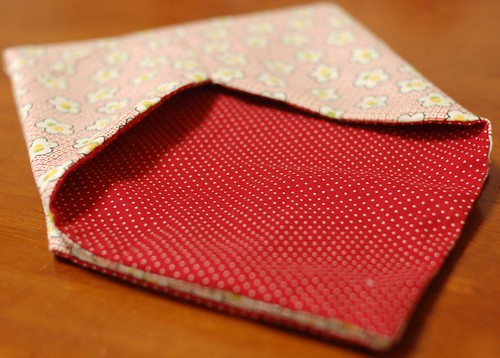
And fold it in two.

Sew at the bottom line to separate the outside pockets.

Open it again and fold in two the other side out.

Then sew the both side lines leaving 1 inch from the top(Leaving the space to put strings in).

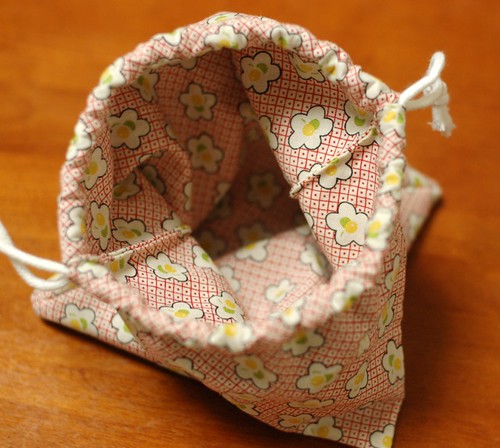
Turn it out again. Now you have the main pocket and two outside pockets.

And fold the top triangle like the picture.

Sew at 0.5 inches from the top on both side.
Put two strings from both sides. That's all!
If you make it from a hanky, you don't need so much time to sew.
The fabric what I used for the outside is my favorite one (* v *).
By the way,,, today I organized my stashes so I chose some of my favorites and cut little pieces.

They are for my next give away. Now I have 5-6 books for it, so I can choose 5-6 readers. I'd like to thank you for all and choose as many as I can.
Please give me some time more to prepare.
Thank you for reading again.
Today's work was a little hard for me, but I'm fine at all(* v *).
Oh, by the way, I made this toast today. It was quite easy and simple.
Cookpad Toast recipe
I know you cannot read Japanese, but it has pictures.
1) Cut the bread like the picture.
2)Put it on the pan and put some oil in the square. Put an egg, salt and pepper in it and mix them.
3) Put a slice of cheese on the egg.
4) Put the square left at step 1 on it.
5) Turn it out.
That's all! I put a slice of ham also.
See you (* v *)!!!!


276 comments:
1 – 200 of 276 Newer› Newest»Dear may ,thanks for taking the time to shere this tuturial with all of us .good to know that you are feeling better .
for me today was special it is Purim in iseal it holiday were children were costume and it is most exsiting to have them ready for kindergarden.
have a good weekend ,
keren Gillan
Thanks for the tuto, and thanks for thinking of us!
I'm fond of bags and origami, never seen anything like it.I'll make it.Thank you.If you eat eggs you probably feel much better?Y.S
Thanks for the tutorial. It is a great design!
Lovely! Hope you and your tomato are feeling well. Domo arigato!
I am so glad you are feeling better these days! The bag is sooooo cute! Thank you for taking the time to do a tutorial for us all.
Have a wonderful day. Joan
Thank you for the tutorial, it's a lovely bag!
Thank you for the tutorial. My son likes origami very much so I think I will make one for him and his toy cars. We like to eat this food here, too! We cut a circle from the bread and call it "egg in the hole." :)
That is the coolest bag design ever--so tidy, and it really showcases the fabric. Thank you for sharing that with us, and be well!
That's a wonderful bag - I think I'll make one today. Thank you so much for the tutorial.
I make a similar egg-in-bread dish, but we cut out a circle and call it eggs in a basket, here. Maybe I should make one for my lunch!
SongBird
This is a wonderful bag. I'm sure I'll make one for my own little girl. Hope you're feeling well...
very clever construction - hope to try it out tonight as office will be closed early due to snow.
thank you for the recipe link - pictures help a lot! I once had a ceramic teacher who brought Japanese recipe books for the lovely handmade dining wares that appear with the foods.
This bag is awesome, and so clever! Thanks for sharing the tutorial, Mai. I will definitely be making this right away.
(P.S. Hi, Tomato!)
Oh Mai, the bags is brilliant! I MUST make this one!!!
Thank you for sharing, both your tutorials and your life. I always enjoy visiting your blog.
Thanks you Mai! The bag is so cute and the recipe is yummy looking!
Take as much time as you need. Rest is essential as you well know. :-)
Thank you for this wonderful tutorial! This bag is so cute and very useful.
Congratulations on your recent marriage!
Have a lovely and restful weekend
hugs,
Heidi
Hi Mai!
I love origami and LOVE the things you make!
You've chosen some lovely fabrics as well.
Thank you so much for sharing this tutorial! It is very clever indeed!
Maria
that is a lovely bag - I will have a try at making it - but then I think that about all your wonderful tutorials!
Great, lovely idea as usual!
Thank you very much!
What a delightful bag, it looks great and I shall have to take my time making one to get all the steps right!
Thanks so much for all your amazing tutorials - I love them! and I noticed ages ago that you had a tiny rabbit charm, must find the post. Would love to see a tutorial of it, if you ever do one!
Your dinner sounded nice!
many thanks, Annette
Thank you for the tutorial Mai. it's it beautiful
Oh, Mai, this will have to be made over the weekend! Thank you for the step-by-step help and photos. Take good care of yourself...
best - Annri
I've just made one this morning !!It's absolutely great!Quick to make,so pretty.it's important to take a real square piece of material..;I'd a little fright at the end when i turned it out..but it's okay.and i put two strings.I'll have to make another one for my daughter.Many thanks.Y.S
Hi!
I love origami and I think your model is great. I would like to thank you for all your tutorials and I cannot find the words...I think is very kind of your to share all of these models...
Thanks a lot!!!
I hope you and your tomato are feeling well.
Thank you for sharing with us, it´s a nice bag and a great tutorial!
My goodness, what a delightful little bag. I need a new project - I think this will be it! Best wishes to you...
Thank you so much for the tutorial and the recipe. You are so clever! Hope you and your family have a nice weekend. :)
Ahh...origami drawstring bag! <3
And thank you for the link to the toast, I love those with faces made by other readers :)
体に気を付けてね!
What a lovely little bag!! I posted a link to your tutorial on Craft Gossip Sewing:
http://sewing.craftgossip.com/tutorial-origami-drawstring-pouch/2010/02/27/
--Anne
Hi, I hope you don't mind, I have added a couple of your tutorials to my 100+ fat quarter tutorials post, thank you for sharing :o)
jo
http://jojoebi.blogspot.com/2010/02/fabric-swap-100-fat-quarter-tutorials.html
Love your tutorial and your sweet blog!
This is awesome! Thanx for sharing with us
thank you for the tutorial! and i'm going to try out the toast later! ^^
Great tute, that bag is gorgeous! I'll definitely be trying that :D
You have great ideas and some are so simple and very nice. I am always checking your blog for new sewing ideas - thank you!
Your the best! Hugs!!
Mai,
I sent you an e-mail om Gmail.
Cintia
That is so clever! Thanks so much for this, I'll be linking.
Mai,
I made a drawstring bag based on your instruction. The Origami I used was brought at 有馬温泉 where I visited one year ago. Thanks for sharing the tutorial. The bag is so nice!!!! Wish you and your tomato are feeling well!
Your supporter, Wing Yee
So, so pretty! I want to make on, or many! Thanks for the tutorial!
congratulation ! your blog is very beautiful
Thanks for the tutorial! That bag is magic!
WOW! So cool! I will have to try this out!
done! Just made one and I love it! I am thinking this is a great little bag for holding jewelry when you travel!
I love this bag. I can't wait to make one for myself. Thanks for sharing.
You are amazing, and I love your blog:) Congrats on your baby and wedding and keep posting.
Thanks for this tutorial! These bags are wonderful.
This is awesome, tag on my "to do" list!
so clever and cute to boot. My mind is already thinking of all the things I can use it for. It could also be made bigger and used for a purse. Although I would need really big squares. Thank you very much. I'm glad you are feeling better.
Very nice idea !!! I wand to try it !! Thank you for this tutorial ...
;-) from paris
Olá, adorei a ideia, vou tentar fazer, obrigada por partilhar, bjos doces
So cute! I have got to make this. What a clever idea.
Thank you! Love the pattern. Can't wait to make one.
Hello Mairuru,
first of all congratulations for the coming baby.
We want to thank your for the bright ideas you have and also for your great generosity in sharing all your knowledge.
We are two Spanish young ladies of over 60 and one of our daughters, this one is young, more or less your age. We are great fans of you and we really enjoy putting into practice many of your creations.
Another time we'll send you some pictures of what we have been doing thanks to you.
That's all for today but we'll be in touch with you again.
We also like the way you keep us informed of what you do at weekends!
We liked vey much the pictures of the cherries in blossom.
Love from
Fina and Rosa and Sandra
Thanks so much for this wonderful tutorial !!!
Great pictures and was very easy to follow !!!
I made one last night and blogged about it today :-).
Thanks Again !!!
I like to make somethings by myself, so i want to open a DIY store. the method to make an origami drawsting bag is useful, i will tell my friends.
Hello mai,
thank you for this tutorial. I find your blog because someone in Germany had tagged him. Look here:
http://weltenfunde.blogspot.com/
I love japanese thing and for 9 years we spend our honeymoon in yokohama. I often think about this beautiful time and the many interessing things.
Many greetings from germany and sorry about my bad english
Annette
This is a great tutorial! I made this bag and posted pics on my blog here: http://violetandvelvet.blogspot.com/2010/08/origami-bag-pictures-finally.html
So cute!
Just found your blog via epbot who lead me to Laupre!
Totally caught my eye! You're work is beautiful. I will definitely check your etsy store!
nice info.. hope i can make it one day.
love this tutorial... thanks for sharing
I made three of these this year for Christmas gifts. Thanks for the tutorial. I linked back to you on my blog. http://nrnoodle.blogspot.com/2011/01/great-start-to-year.html
I like you little bag very much and made it yesterday. It is a birthday-present for a girlfriend.
Your Blog was very interesting to reading, best wishes for you and your family from Germany
Nice post! thanks for sharing
Thousands of thanks. That's a wonderful way to start sewing and make beautiful gifts for my friends.
Regards from France
It it so cute, thank you!
This is really really my one of the best blog because I love the origami drawstring bags. I really wondering after saw this woderful design! This is useful bag for me. Thaks for sharing this post so much.
Nice to read that, all information is good, feel good to read that, nice tuto. :)
At first I was wondering why origami? And then after looking at the directions, I realized why. Made this cool idea even cooler.
Learning keeps you open and allows you to grow with confidence. Being connected to others through personal experience makes your journey to success more alive and can help to generate excitement in your pursuit. You need to be very persistent in your pursuit.
Concerns about this controversial measure and the associated contributions to climate change are driving many groups to reassess the policy.
As a resultant implication, the characterization of specific criteria necessitates that urgent consideration be applied to the structural design, based on system engineering concepts.
Knowledge giving Article! I appreciate you. I completely agree with you. If we talk about current scenario then it is must be update. I enjoyed reading. I would like to visit more for more queries.
Greek Clothing
Blog is really informative and entertainng same time. I appriciate the efforts made by mairuru.
Thanks for the tutorial. It's simple and easy to understand. Next Friday publish a post on my blog with a link to your blog.
You have inspired me.
http://elrincondedippy.blogspot.com.es/
Great sharing i have got here Thanks a lot.
We will provide them well-trained chauffeurs so that you leave a good impression on your corporate clients. For corporate clients, we also have variable packages and offers. So, what are you waiting for? We are here to give you luxury car rental Dubai; just grab it! Just contact us via email or book online!!!
Luxury Cars Rental Dubai
Luxury Car Rental Dubai
Visit Here: http://www.racluxuryrental.com/
+971 56 845 2520
Cheapest Tickets with special offers for theme parks, attraction, tour, zoo, animal kingdom and universal studio in San Francisco, Atlanta, Boston, New york, Orlando, San Diego, Niagara, Chicago and more - All Park Tickets in USA
All Park Tickets
Visit here: https://www.allparktickets.com/
Address
ALL PARK TICKETS
1415 McCoy Rd,
Suite A,
Orlando, Florida 32809,
USA.
Build your website ranking first page on Google with ease through professional #SEOCompany in India and website designing services from Iaptris. Find out more about our custom plans today!
https://www.iaptris.com/
Looking for top apparel #FashionDesigner product manufacturing? Here's a list of Top Indian Freelance fashion designer manufacturing with details of their services. Explore Now!
https://collarweb.com
These are designed very beautifully!
Take a look of our services down here:-
Delhi Escorts
Call Girls in Delhi
Call Girl Service in Delhi
Hyderabad Escorts Service is one of the best escorts service in all over the India. Hyderabad Escorts provides best Hyderabad Call Girls at economic price all over the Hyderabad. Hyderabad Call Girls are looking very sexy and charming they are available 24*7 for enjoying her male partner .
Hyderabad Esorts Service
Hyderabad Escorts
Hyderabad Call Girls
Call Girls In Hyderabad
Are you want to enjoy with call girls? So Hyderabad Escorts Service is the best platform for you. Because Hyderabad Call girls are looking very hot and very pretty. There are many types of Escorts girls available at different different price. So don’t waste your time contact on Hyderabad Escorts Service .
Hyderabad Esorts Service
Hyderabad Escorts
Gurgaon Escorts Call +91 8587837371
Our foreign choice of girls are very unlimited, we have series of foreign girls who are waiting on the list to satisfy you and make you enjoy the best time of your life they ranges from, blonde hot sexy girls, fair, milf, Punjabi girls, western babes, all continent girls, house wives are very much included in our call girls service. To take your pleasure in your palm and make every moment of your life much better amazing from the last one, you just need to put a call through to Gurgaon call girls services.
There is the presence of unique extra-ordinary sexy with the ability to make your heart beat for more pleasure in life, erotic girls that of hot ass and curves and foreign babes only for your eyes only, these girls are ready to do anything you instruct them to do, they are willing to offer themselves to you in a very pleasurable manner. Hot charming and super sexy curvy shaped teen and matured call girls are here waiting for your service and waiting to give you pleasure call us @ +91 8587837371.
Call Girls In Gurgaon
Best Call Girls In Gurgaon
Call Girl In Gurgaon
Call Girls service In Gurgaon
Gurgaon call girls services
Gurgaon Call Girlss
Gurgaon Escorts Services
Gurgaon Escorts Services
independent Escorts Services in Gurgaon
The commencement of Gurgaon Call Girls Service is provided through our escort’s contributors, they have been working inside the following area of Gurgaon as we will discuss later before calling us you ought to have required to knowing the policy of Gurgaon M G Road Call Girls Service. Very first I would like to tell you that kindly speak politely with our faculty, and if you are below twenty-one years vintage then immediately depart on this page, due to the fact the content of this internet site isn't suitable for you. It is provision for the grownup character who understand higher their liability and duty and contacting us for informal period. This form of courting is considered to be the casual courting under which the customer has to pay to the employer for the sensual service and corporation for this introduce its contributors (Gurgaon Call Girls) to the patron and this deal is erotic deal.
Call Girls In Gurgaon Call +91 8587837371
Call Girls In Gurgaon
Best Call Girls In Gurgaon
Call Girl In Gurgaon
Call Girls service In Gurgaon
Gurgaon call girls services
Gurgaon Call Girlss
Gurgaon Escorts Services
Gurgaon Escorts Services
independent Escorts Services in Gurgaon
Escort Services in Bangalore
Escort in Bangalore
Bangalore Escort Agency
High Profile escort in Bangalore
Russian escort in Bangalore
Hi My Name is Alisha Petel at I read your all Blog. Your blog is very informative. When you hook up with our high-profile Model you are bound to get maximum erotic pleasure from them. (07045557873)As all of these Model come from a higher class and are well-educated, sensuous and seductive, they take the sensual pleasure of clients to unimagined heights. Dating this class of escorts will not only arouse your passion and rejuvenate your senses but will let you feel exhilarated and ecstasy.http://puneindependentescorts.com/ You and your partner will be enjoying the same feelings and emotions. Remember that lovemaking is not only confined to a single partner. Instead, it is confined to both of you. There is nothing to be doubtful about the quality of these escorts since they are very attractive and keep your senses gratified when you hire any of these escorts and spend some quality time with her. For more details please visit here.Thank You for Sharing Blog.
Pune escorts
Bangalore Escorts
Mumbai Escorts
While having a company with an Alisha you should also adopt a good attitude. You too should be generous in your attitude. Consider her as your true friend not merely as sexual partner. Share your innermost feelings with her and do not waste much time in having a gossip with her.
Sex Services In Mumbai
Koregaon Park Escorts
Escorts Girls In Mumbai
For more details please visit here.Thank You for Sharing Blog.
call girl in Bangalore
Escort in Bangalore
VIP escort in Bangalore
Bangalore escorts
Escort Service in Bangalore
Hyderabad escorts service is one of the best escorts in india.If you want to enjoy your days with call girls contact Hyderabad Escorts Service or call girls in Hyderabad .
Hyderabad Escorts Service
Hyderabad Escorts
Hyderabad Call Girls
Escorts in Shirdi
Shirdi Escorts services
Shirdi Escorts
Shirdi Escorts Girl
Shirdi Female Escorts
Female Escorts Services In Shirdi
Shirdi Independente Escorts
Escorts in Jaipur
Jaipur Escorts services
Jaipur Escorts
Jaipur Escorts Girl
Jaipur Female Escorts
Female Escorts Services In Jaipur
Jaipur Independente Escorts
Escorts in Vijayawada
Vijayawada Escorts services
Vijayawada Escorts
Vijayawada Escorts Girl
Vijayawada Female Escorts
Female Escorts Services In Vijayawada
Vijayawada Independente Escorts
ESCORTS IN SUSHANT LOK – SEXY URVASHI CALL GIRLS
A Night of Devotion and Intimate Moments with Gurgaon Escorts
Call Girls services in Sushant Lok is of great quality and experience, the high level of expertise in the Call Girls service providers contributed to enhancing the quality of their service provision to the people. Competitive call girls service providers in Sushant Lok can also be viewed to have influenced the level of best services offered to customers in this city in terms of each call girls service providers trying all their possible best to offer more quality service compared to their counter-part. Sushant Lok is a growing industrial city. high profile call girls Sushant Lok, Independent Call Girls in Sushant Lok, escort service in Sushant Lok, escorts service Sushant Lok, Sushant Lok escorts, Sushant Lok escorts service, russian escorts in Sushant Lok, hotel escorts in Sushant Lok, college girls in Sushant Lok, housewifes in Sushant Lok, Sushant Lok is a developed area of Gurgaon in India; it is located on in Gurgaon district of state Haryana.
Call Girls in Gurgaon
Call Girls in Gurgaon
sikanderpur
sushant-lok
call-girls-in-gurgaon
call-girls-delhi
gurgaon-call-girls
blog
high-profile-call-girls-in-gurgaon
blog
sikanderpur-call-girls
call-girls-huda-city-center
college-call-girls-gurgaon
sexy-call-girl-gurgaon
call-center-girls-escort
iffco-chock-call-girls
sikandarpur-hiprofile-escorts
call-girls-sikanderpur-gurgaon
bus-stand-escorts-call-girls
call-girls-gurgaon
call-girls-mg-road
hudacity-centre-call-girls
high-profile-call-girls-in-gurgaon
escorts-service-in-gurgaon-with-sexy-call-girls
best-call-service-in-gurgaon
gurgaon-call-girls-service
russian-escorts-sikanderpu
best-call-girls-gurgaon
Call girls in Gurgaon | Details of Service Area Call 9990069753
hello reshab here please follow our link for all vip escorts in bangalore complete details for independent escorts service in bangalore
independent escorts service in bangalore
Antivirus support
Antivirus support Number
Antivirus support Customer care
Norton Antivirus support
Norton Antivirus support Number
Norton Antivirus support Customer care
Mcafee Antivirus support
Mcafee Antivirus support
Mcafee Antivirus support
AVG Antivirus support
AVG Antivirus support Number
AVG Antivirus support Customer care
Avast Antivirus support
Avast Antivirus support Number
Avast Antivirus support Customer care
hello reshab here please follow our link for all vip escorts in bangalore complete details best escort service in bangalore
best escort service in bangalore
escort service in bangalore
escort in bangalore
escort bangalore
bangalore escort
Hello, all the gentlemen welcome to the Kia escorts. I am now going to tell about the Goa escorts. as we all know that goa is a very beautiful city surrounded by all the beautiful beaches. It surrounded by the Arabian sea. the beauty of goa specially made for the couple. Who wants to fall in love with each other without any hesitation without care of anyone holding each other hands. our call girls will be taken care of the clients like the girlfriend.they just believe to love their clients in the surroundings of goa. Goa weather is also very pleasant for the sex service.its just like that some places specially created by the god for the fun & pleasure.
Goa Escorts
درب ضد سرقت تمام نرك و پك ترك نيز شامل موارد بالا شده ونيز يك ايتم ديگر در ان نيز روي قيمت تاثير زيادي خواهد داشت
source - منبع
درب ضد سرقت
Independent escort in Bangalore
escort service in Bangalore
Female escort in Bangalore
Escort female in Bangalore
Escort girl in Bangalore
Call girl in Bangalore
Onlinemoviewatchs
Hume Tumse Pyaar Kitna’ is a few decades too late, as it reminds you of the era when Bollywood movie tales of creepily obsessive lovers.
The climax, too, falls flat and the film offers nothing that you have not seen before in this genre.
filmywap hollywood movie
filmywap Bollywood movie
filmywap Bollywood movie
new hindi movie download
free movies download
onlinemovieswatchs
onlinemoviewatch
onlinemoviewatchs
watch online movies
watch online movie
watch HD online movie
online movies
Onlinemoviewatchs.to
Onlinemoviewatchs.to
Onlinemovieswatch.org
Filmywap
Watch Movies Online
Filmywap Bollywood Movies
Onlinemoviewatchs.cx
onlinemoviewatchs
hollywood-movies-2019
online-hollywood-movies-2018
hollywood-2017
hollywood-2016
hollywood-2015
hindi-movies-2019
hindi-2018
hindi-2017
hindi-2016
hindi-movies-2015
dubbed-movies
south-movie-in-hindi
telugu-movies-2019
telugu-movies-2018
telugu-movies-online
telugu-dubbed-movies
tamil-movies-2019
tamil-movies-2018
online-tamil-movies
tamil-dubbed-movies
malayalam-movies-2019
malayalam-movies-2018
malayalam
hindi-web-series
hindi-dubbed-series
adult-movies
punjabi-movies
south-movie-in-hindi
kannada-movie-2018
marathi-movies
bengali-movies
pakistani
Onlinemoviewatchs
filmywap hollywood movie,filmywap Bollywood movie,filmywap Bollywood movie,new hindi movie download,free movies download
onlinemovieswatchs,onlinemoviewatch,watch online movies,watch online movie,watch HD online movie,online movies,Onlinemoviewatchs.cx
Filmywap Bollywood Movies,Watch Movies Online,Filmywap
filmywap hollywood movie
filmywap Bollywood movie
filmywap Bollywood movie
new hindi movie download
free movies download
onlinemovieswatchs
onlinemoviewatch
onlinemoviewatchs
watch online movies
watch online movie
watch HD online movie
online movies
Onlinemoviewatchs.to
Onlinemoviewatchs.to
Onlinemovieswatch.org
Filmywap
Watch Movies Online
Filmywap Bollywood Movies
Onlinemoviewatchs.cx
onlinemoviewatchs
hollywood-movies-2019
online-hollywood-movies-2018
hollywood-2017
hollywood-2016
hollywood-2015
hindi-movies-2019
hindi-2018
hindi-2017
hindi-2016
hindi-movies-2015
dubbed-movies
south-movie-in-hindi
telugu-movies-2019
telugu-movies-2018
telugu-movies-online
telugu-dubbed-movies
tamil-movies-2019
tamil-movies-2018
online-tamil-movies
tamil-dubbed-movies
malayalam-movies-2019
malayalam-movies-2018
malayalam
hindi-web-series
hindi-dubbed-series
adult-movies
punjabi-movies
south-movie-in-hindi
kannada-movie-2018
marathi-movies
bengali-movies
pakistani
It's an incredible chance to give up depleting and fuckin sexual positions and experience intercourse which will underneath your cerebrum. Our creative and energetic Bangalore Escorts Services will pass on you in a dozing issue of warmth. Their various strategies to serving their figure in different groupings are simply grand. Here are an immense number of different mating positions that accept an unimaginable activity truly coming to fruition of coupling dumbfounding. We give our organizations in different terms of closeness in different terms of charges and range.
So people get ready to experience astounding and unprecedented sex.
Bangalore Escort
Bangalore Escorts Services
Escorts in Bangalore
Escort in Bangalore
Call Girl in Bangalore
Bangalore Call Girl
Bangalore Escort
Bangalore Escorts Services
Escorts in Bangalore
Escort in Bangalore
Call Girl in Bangalore
Bangalore Call Girl
Bangalore Escort
Bangalore Escorts Services
Escorts in Bangalore
Escort in Bangalore
Call Girl in Bangalore
Bangalore Call Girl
Hsr Layout Escorts
Hsr Layout Call Girl
Hsr Layout Escort Service
Escorts in Hsr Layout
Hsr Layout Female Escorts
Female Hsr Layout Escorts Services
https://honsbridge.edu.my/members/liontattoo/
https://blog.libero.it/wp/smalltattoo/2019/07/02/small-tattoos-for-men/
https://www.liveinternet.ru/users/katy_jones/post417209959/
https://topibestlist.com/
Russian escorts Service in Jaipur
At the center of its impressive street grid holds the prosperous, colonnaded City Palace mania.
With gardens, courtyards and museums, part of it is still a royal residence of Russian escorts in Jaipur.
Our loved high profile escorts in Jaipur are celebrities/ models, our client feels the desired life, and has a night with Nusrat Jahan Russian escorts in Jaipur.
jaipur-call-girls
haridwar-escort-call-girl
rishikesh-escort-call-girl
call-girls-in-dehradun
call-girls-in-gurgaon
call-girls-in-agra
Nice Post
filmywap hollywood movie
filmywap hollywood movie,filmywap Bollywood movie,filmywap Bollywood movie,new hindi movie download,free movies download
onlinemovieswatchs,onlinemoviewatch,watch online movies,watch online movie,watch HD online movie,online movies,Onlinemoviewatchs.cx
Filmywap Bollywood Movies,Watch Movies Online,Filmywap
filmywap hollywood movie
filmywap Bollywood movie
filmywap Bollywood movie
new hindi movie download
free movies download
onlinemovieswatchs
onlinemoviewatch
onlinemoviewatchs
watch online movies
watch online movie
watch HD online movie
online movies
Onlinemoviewatchs.to
Onlinemoviewatchs.to
Onlinemovieswatch.org
Filmywap
Watch Movies Online
Filmywap Bollywood Movies
Onlinemoviewatchs.cx
onlinemoviewatchs
hollywood-movies-2019
online-hollywood-movies-2018
hollywood-2017
hollywood-2016
hollywood-2015
hindi-movies-2019
hindi-2018
hindi-2017
hindi-2016
hindi-movies-2015
dubbed-movies
south-movie-in-hindi
telugu-movies-2019
telugu-movies-2018
telugu-movies-online
telugu-dubbed-movies
tamil-movies-2019
tamil-movies-2018
online-tamil-movies
tamil-dubbed-movies
malayalam-movies-2019
malayalam-movies-2018
malayalam
hindi-web-series
hindi-dubbed-series
adult-movies
punjabi-movies
south-movie-in-hindi
kannada-movie-2018
marathi-movies
bengali-movies
pakistani
Nice post
My Quickbook Support
Gst ready online software for your Business- My Quickbook Support
My Quickbook Support
My Quickbook Support
My Quickbook Support
My Quickbook Support
My Quickbook Support
My Quickbook Support
Nice Post
filmywap hollywood movie
filmywap hollywood movie,filmywap Bollywood movie,filmywap Bollywood movie,new hindi movie download,free movies download
onlinemovieswatchs,onlinemoviewatch,watch online movies,watch online movie,watch HD online movie,online movies,Onlinemoviewatchs.cx
Filmywap Bollywood Movies,Watch Movies Online,Filmywap
filmywap hollywood movie
filmywap Bollywood movie
filmywap Bollywood movie
new hindi movie download
free movies download
onlinemovieswatchs
onlinemoviewatch
onlinemoviewatchs
watch online movies
watch online movie
watch HD online movie
online movies
Onlinemoviewatchs.to
Onlinemoviewatchs.to
Onlinemovieswatch.org
Filmywap
Watch Movies Online
Filmywap Bollywood Movies
Onlinemoviewatchs.cx
onlinemoviewatchs
hollywood-movies-2019
online-hollywood-movies-2018
hollywood-2017
hollywood-2016
hollywood-2015
hindi-movies-2019
hindi-2018
hindi-2017
hindi-2016
hindi-movies-2015
dubbed-movies
south-movie-in-hindi
telugu-movies-2019
telugu-movies-2018
telugu-movies-online
telugu-dubbed-movies
tamil-movies-2019
tamil-movies-2018
online-tamil-movies
tamil-dubbed-movies
malayalam-movies-2019
malayalam-movies-2018
malayalam
hindi-web-series
hindi-dubbed-series
adult-movies
punjabi-movies
south-movie-in-hindi
kannada-movie-2018
marathi-movies
bengali-movies
pakistani
Beirut Angels Lebanon , Premium Dating and Escort Girls provider agency in Beirut , Our Agency Located in The Heart Of Beirut , We are provide Finest Models , Russian Girl , And Top class Beirut escorts for companion in Lebanon , IF you like to Book Beirut escorts in Lebanon For Premium Beirut escorts services in Lebanon Either outcall or incall just Call us for Book your Dream Beirut escort girls from our Website online visit : http://www.beirutescortservice.com/beirut-escort-girls.php
quickbooks customer service
quickbooks phone number
quickbooks helpline number
quickbooks customer service
quickbooks customer service number
quickbooks online support
quickbooks customer care number
quickbooks customer care number
quickbooks support phone number
quickbooks customer service
quickbooks phone number
quickbooks support number
quickbooks online support
quickbooks customer service phone number
quickbooks customer support
quickbooks help number
quickbooks customer service number
quickbooks help desk phone number
quickbooks contact number
quickbooks support telephone number
quickbooks online support phone number
quickbooks online support number
quickbooks online phone number
quickbooks helpline
quickbooks customer care phone number
quickbooks customer support phone number
quickbooks helpline number
quickbooks telephone number
quickbooks help phone number
quickbooks customer support number
quickbooks customer care
quickbooks contact support phone number
quickbooks pro support
quickbooks desktop support phone number
quickbooks payroll support phone number
quickbooks toll free number
quickbooks helpline phone number
quickbooks customer service telephone number
quickbooks support contact number
quickbooks help desk number
quickbooks customer number
quickbooks help contact
quickbooks help support number
quickbooks online c hat help
quickbooks customer support phone number usa
quickbooks contact number usa
quickbooks help phone number usa
Nice Post
filmywap Bollywood movie
filmywap hollywood movie,filmywap Bollywood movie,filmywap Bollywood movie,new hindi movie download,free movies download
onlinemovieswatchs,onlinemoviewatch,watch online movies,watch online movie,watch HD online movie,online movies,Onlinemoviewatchs.cx
Filmywap Bollywood Movies,Watch Movies Online,Filmywap
onlinemoviewatchs
hollywood-movies-2019
online-hollywood-movies-2018
hollywood-2017
hollywood-2016
hollywood-2015
hindi-movies-2019
hindi-2018
hindi-2017
hindi-2016
hindi-movies-2015
dubbed-movies
south-movie-in-hindi
telugu-movies-2019
telugu-movies-2018
telugu-movies-online
telugu-dubbed-movies
tamil-movies-2019
tamil-movies-2018
online-tamil-movies
tamil-dubbed-movies
malayalam-movies-2019
malayalam-movies-2018
malayalam
hindi-web-series
hindi-dubbed-series
adult-movies
punjabi-movies
south-movie-in-hindi
kannada-movie-2018
marathi-movies
bengali-movies
pakistani
filmywap hollywood movie
filmywap Bollywood movie
filmywap Bollywood movie
new hindi movie download
free movies download
onlinemovieswatchs
onlinemoviewatch
onlinemoviewatchs
watch online movies
watch online movie
watch HD online movie
online movies
Onlinemoviewatchs.to
Onlinemoviewatchs.to
Onlinemovieswatch.org
Filmywap
Watch Movies Online
Filmywap Bollywood Movies
Onlinemoviewatchs.cx
quickbooks customer service number
quickbooks phone number
quickbooks helpline number
quickbooks customer service
quickbooks customer service number
quickbooks online support
quickbooks customer care number
quickbooks customer care number
quickbooks support phone number
quickbooks customer service
quickbooks phone number
quickbooks support number
quickbooks online support
quickbooks customer service phone number
quickbooks customer support
quickbooks help number
quickbooks customer service number
quickbooks help desk phone number
quickbooks contact number
quickbooks support telephone number
quickbooks online support phone number
quickbooks online support number
quickbooks online phone number
quickbooks helpline
quickbooks customer care phone number
quickbooks customer support phone number
quickbooks helpline number
quickbooks telephone number
quickbooks help phone number
quickbooks customer support number
quickbooks customer care
quickbooks contact support phone number
quickbooks pro support
quickbooks desktop support phone number
quickbooks payroll support phone number
quickbooks toll free number
quickbooks helpline phone number
quickbooks customer service telephone number
quickbooks support contact number
quickbooks help desk number
quickbooks customer number
quickbooks help contact
quickbooks help support number
quickbooks online chat help
quickbooks customer support phone number usa
quickbooks contact number usa
quickbooks help phone number usa
Thanks for shareing
filmywap Bollywood movie
filmywap hollywood movie
filmywap Bollywood movie
filmywap Bollywood movie
new hindi movie download
free movies download
onlinemovieswatchs
onlinemoviewatch
onlinemoviewatchs
watch online movies
watch online movie
watch HD online movie
online movies
Onlinemoviewatchs.to
Onlinemoviewatchs.to
Onlinemovieswatch.org
Filmywap
Watch Movies Online
Filmywap Bollywood Movies
Onlinemoviewatchs.cx
onlinemoviewatchs
hollywood-movies-2019
online-hollywood-movies-2018
hollywood-2017
hollywood-2016
hollywood-2015
hindi-movies-2019
hindi-2018
hindi-2017
hindi-2016
hindi-movies-2015
dubbed-movies
south-movie-in-hindi
telugu-movies-2019
telugu-movies-2018
telugu-movies-online
telugu-dubbed-movies
tamil-movies-2019
tamil-movies-2018
online-tamil-movies
tamil-dubbed-movies
malayalam-movies-2019
malayalam-movies-2018
malayalam
hindi-web-series
hindi-dubbed-series
adult-movies
punjabi-movies
south-movie-in-hindi
kannada-movie-2018
marathi-movies
bengali-movies
pakistani
filmywap hollywood movie,filmywap Bollywood movie,filmywap Bollywood movie,new hindi movie download,free movies download
onlinemovieswatchs,onlinemoviewatch,watch online movies,watch online movie,watch HD online movie,online movies,Onlinemoviewatchs.cx
Filmywap Bollywood Movies,Watch Movies Online,Filmywap
entertainment tools on single platform
video downloader tool vidmate app
advanced features vidmate application
vidmate latest advanced feaures
vidmate features update
Hyderabad Celebrity Escorts
Independent Escort Hyderabad
high class Celebrity Escort Hyderabad
VIP Celebrity Escorts in Hyderabad
Hyderabad escorts College Girls
College Call Girls in Hyderabad
College Girl Escorts Hyderabad
College Girls & Models
Independent VIP Model Escorts
High Profile Escorts in Hyderabad
Hi dear good awesome...very good article.live result
I was looking BA 1st Year Result at some of your posts on this website BA 3rd Year Result and I conceive this web site is really instructive! BA Rechecking Result 2019 Keep putting up..
Manufacturer of Zip Puller and Pouch - Zipper Pouch, Bags Adjuster, Printed Zipper Lock Pouches and Plastic Zipper offered by eco metaltrims.
http://ecometaltrims.com/
https://www.ecometaltrims.com/doghooks.html
https://www.ecometaltrims.com/buckle.html
https://www.ecometaltrims.com/zipper.html
https://www.ecometaltrims.com/chains.html
https://www.ecometaltrims.com/locks.html
https://www.ecometaltrims.com/adjuster.html
Bangalore Sexy Girls
High profile escorts services
Cheap Rate Escorts Service in Bangalore
Escorts Service In Bangalore
Bangalore Escorts with Photos
Independent Bangalore escort call girl
College Call Girls 24/7
Housewife Escorts in Bangalore
Bangalore call girls Service
Sexy Female Escorts in Bangalore Hotels
Escort service in Bangalore
Bangalore escort service
Escort Bangalore
Bangalore girls
Bangalore Escort
Independent girls in Bangalore
bangalore city girls
russian escort service in bangalore
russian escorts in bangalore
vip escorts bangalore
top call girls in bangalore
vip call girls in bangalore
bangalore escorts call girls
Escort service Bangalore
We are the brigade spa group the best Escort in Bangalore.
We are the oldest and most experienced Best Escort Service in Bangalore we are the leading Escort service provider.
We have been serving our customers with all exotic and luxurious service since 20 years in Bangalore and we are well known as the one of the Vip Escort Service Bangalore by our customers our Indian.
foreigner profiles are available 24/7 with Hygienic and luxurious AC accommodation at your service we provide in-call n outcall facilities.
we are well known for our customer satisfaction with our wide range of Indian and Foreign Call Girls profiles including ramp walk models, co-artist, show stopper, co-actress, etc. by changing them frequently.
We show what u get under services our profiles are happy to satisfy your desires. Our profiles are duly examined by doctors.
Escort service in Bangalore
Bangalore escort service
Escort Bangalore
Independent girls in Bangalore
russian escort service in bangalore
top call girls in bangalore
vip call girls in bangalore
bangalore escorts call girls
Escort service Bangalore
حسن درب MDF ضد اب اين است كه علاوه بر در ضد اب بودن هر طرحي را مي توان روي ان انداخت و دست طراح باز مي باشد
درب ضد آب
Nice Post thanks for the information, good information & very helpful for others,Thanks for Fantasctic blog and its to much informatic which i never think ..Keep writing and grwoing your self
duplicate rc online
duplicate rc in delhi
duplicate rc in greater noida
duplicate rc in bangalore
duplicate rc in faridabad
duplicate rc in gurgaon
duplicate rc in noida
duplicate rc in ghaziabad
death certificate online
gst registration in sri ganganagar
call girls in Port Blair |
call girls in Pune |
call girls in Rajkot |  
call girls in Ranchi |
call girls in Solapur |
call girls in Srinagar |
call girls in Surat |  
call girls in Thane |  
call girls in Trichy |
Meet the most beautiful busty babe in Bangalore. Come and explore the miracle of ripening breasts (adorned with attractive bust line) and deep romantic chasm dedicated to offering you limitless love and amour.
call girls in bangalore
Call Girls Escort Service In Bangalore
VIP Call Girls In Bangalore
HI Guys, This is Rishab. I'm one of the best escort service provider in Bangalore, If you are looking for some exotic service in Bangalore then you have landed in correct place. If you have cheated with other Escort agency then all you need to do one thing, Just have service with us once and trust me you will get some amazing service with real Girls. NO CHEAT NO FRAUDS. You are just 1 call away from some amazing life time experience.
Escorts in London
London Escorts
London Female Escorts
London Escorts Agency
London Escorts Service
London Call Girls
Call Girls In London
Kensington Escorts
East London Escorts
West London Escorts
South London Escorts
North London Escorts
Green Park Escorts
London Dating
London Girls
London Escorts Directory
London Independent Escorts
hotgirlscenter.com
https://ukhotgirlscenter.blogspot.com/
Bangalore University B.Com 1st Year Result
Bangalore University B.Com 2nd Year Result
Mysore University BA Part 1 Result
ضد برش نيز باشد پس يكي از اساسي ترين چيزهايي كه در
ضد سرقت درب
بايد براي ان اهميت ويژه اي در نظر گرفت قفل
ضد سرقت درب
مي باشد
Get beautiful and convenient escorts services in Hyderabad. Share your incomplete love with our CallGirls.
where you're invited to soften into my capable fingers, my smooth skin, and candy smile.
My name is Sonia Mehra. I am a petite sensualist with darkie lengthy hair and deep sleepy bedroom eyes.
My frame is nourished with my active care and self-love, my pores and skin feeling smooth and buttery to the touch.
My passions are the timeless moments in life, the silky sun shades inside the sky at dusk or dawn, melting an excellent chocolate
on the tip of my tongue, staring at into an enthusiast's eyes and feeling the heat of each other's breath.
I love mastering your body with the energy of contact, via both mild and adorable strokes to deep and intentional electricity points let us soften into some other universe.
I have been skilled in Swedish massage, deep tissue, and flirty touch.
BEST SERVICE PROVIDER FOR CALL GIRL IN DEHRADUN.
Most importantly in Dehradun is the business of the Call Girls which became so prominent that several individuals started setting up different business in the city for the call girl purpose, there emerged competitiveness in the city in terms of the Call Girl business, we have various call girls service providers in the Dehradun city and each service providers ensures they satisfy their client in order to outrun other service providers, for instance, The Dehradun
change Call Girls services in Dehradun, The Escort Service Dehradun, The Romiyo Escort service in Dehradun and several other Call services in the city. These various call girls service providers advertised their service as a world-class provider of call girls in Dehradun and added that they engaged in offering better-escorting background, several girls are available to offer ranging from the Indian, Russian, fair Middle Eastern beautiful girls who would offer the best incall service satisfying your needs and also giving you a memorable moment of
Call girl in Dehradun
call girls in Dehradun
call girl Dehradun
call girls Dehradun
RUSSIAN CALL GIRL IN DEHRADUN
Call girl in Haridwar
Call girl in Andheri
Modern Call Girls in Dehradun
Sexy call Girl in Dehradun
High Profile Call Girl Dehradun
URVASHI Call Girl in Dehradun
Best Call Girls In Dehradun
Housewife Call girl in Dehradun
Escorts in Dehradun
Best escort service in Dehradun
Escorts service in Dehradun
High profile escort in Dehradun
Call girl in Haridwar
call girls in Haridwar
call girl Haridwar
call girls Haridwar
Call Girls in Gurgaon
Call Girls in Dwarka
Call girl in Noida
kocaeli izmit escort
konya escort
çanakkale escort
kartal escort
pendik escort
malatya escort
balıkesir escort
adana travesti
ceyhan travesti
very nice blog. your blog is verrry good vaovvv retireble
niğde escort
izmir buca escort
kırşehir escort
ısparta escort
nevşehir escort
kayseri escort
edirne escort
BA 1st Year Exam Schedule
BA 2nd Year Exam Schedule
BA 3rd Year Exam Schedule
You just need to appreciate the people and need to control your mind with the Delhil that you can't think more. Karol Bagh Escorts
The customers ought to likewise know the job of an organization in such manner. The office assumes a pivotal job in assisting the customers in employing great and stunning free Delhi Call Girls Delhi call girls with the goal that they can convey remarkable encounters to the customers on schedule.
India's Biggest City Hyderabad Enjoy Full Night @ Booking https://nawabihyd.blogspot.com/
https://charminarpoint.blogspot.com/
https://blissfulhyderabad.blogspot.com/
https://nehalibhabhi.blogspot.com/
https://tumharisexybhabhi.blogspot.com/
http://shahnazrazahyd.over-blog.com/
Really nice post
If this can be your 1st time contacting a Rishikesh Escorts Agency
Follow us:_
Rishikesh escorts
Vip Call Girls In Rishikesh
Call girls in Rishikesh
Rishikesh escorts service
Escorts Service In Rishikesh
Rishikesh call girls
Escort in Rishikesh
Are you looking for Bangalore escorts 6366-692-297 ? If yes then you have ended at the right place. You will have more fun with bangalore escorts. And great to comment on this post really cool and informative in this blog...
bangalore-escorts69.blogspot ,
Escort service in bangalore,
Call girls in bangalore,
Russian escort in bangalore,
Bangalore Escorts,
Escort in Bangalore, .
Great to blog on this post really cool and knowledgeable in this blog..
High profile escort in bangalore(MG Road),
MG Road escorts,
Marathahalli female escort service in bangalore,
Russian escort in bangalore(Jayanagar),
Indiranagar independent escort in bangalore,
Our offer is planned for the people who are rapacious steppingstone from normal life, glancing magnificent incitement in the office of attractive young ladies.
Follow us:-
Bangalore escorts
Bangalore escorts service
Call girls in Bangalore
Vip escorts in Bangalore
Bangalore escorts agency
Bangalore call girls
Bangalore escorts
Bangalore escorts service
Call girls in Bangalore
Vip escorts in Bangalore
Bangalore escorts agency
Bangalore call girls
If you want a babe from the house of Female Escorts in Delhi there are a few things you should know well before making a booking. Firstly our agency here at your city. In simple words is a cut above the rest because of the highly professional services we provide to our clients. Check our other Services...
Russian Escorts in Delhi
Call Girls in Aerocity
Escorts Service in Aerocity
Female Escorts in Aerocity
Each of the women associated with our agency is strictly professional when it comes to rendering her services to her clients. Russian Escorts in Aerocity here at our escort agency make sure that their talents are such that they will never fall short of giving the best of services to their clients. Check our other Services...
Call Girls in Mahipalpur
Escorts Service in Mahipalpur
Escorts in Mahipalpur
Female Escorts in Mahipalpur
Are you looking for Bangalore escorts 6366-692-297 ? If yes then you have ended at the right place. You will have more fun with bangalore escorts. And great to comment on this post really cool and informative in this blog…
bangalore-escorts69.blogspot ,
best Call girls in bangalore,
Russian Escorts in Bangalore,
MG Road Escorts in Bangalore,
Escort service in bangalore,
Call girls in bangalore,
jayanagar escort in bangalore,
Bangalore Escorts,
Escort in Bangalore, .
Great to blog on this post really cool and knowledgeable in this blog..
High profile escort in bangalore(MG Road),
MG Road escorts,
Marathahalli female escort service in bangalore,
jayanagar escort in bangalore,
Indiranagar independent escort in bangalore,
Are you looking for Bangalore escorts 6366-692-297 ? If yes then you have ended at the right place. You will have more fun with bangalore escorts. And great to comment on this post really cool and informative in this blog…
bangalore-escorts69.blogspot ,
best Call girls in bangalore,
Russian Escorts in Bangalore,
MG Road Escorts in Bangalore,
Escort service in bangalore,
Call girls in bangalore,
jayanagar escort in bangalore,
Bangalore Escorts,
Escort in Bangalore,
Great to blog on this post really cool and knowledgeable in this blog..
High profile escort in bangalore(MG Road),
MG Road escorts,
Marathahalli female escort service in bangalore,
jayanagar escort in bangalore,
Indiranagar independent escort in bangalore,
www.ads4call.com
Free Classified Site | Online Ads for Call | Online Classified Site
Free classified ads for cars, jobs, real estate, and everything else. Find what you are looking for or create your own ad for free
www.ads4call.com
www.ads4call.com
Free Classified Site | Online Ads for Call | Online Classified Site
Free classified ads for cars, jobs, real estate, and everything else. Find what you are looking for or create your own ad for free
www.ads4call.com
www.ads4call.com
Free Classified Site | Online Ads for Call | Online Classified Site
Free classified ads for cars, jobs, real estate, and everything else. Find what you are looking for or create your own ad for free
www.ads4call.com
www.ads4call.com
Free Classified Site | Online Ads for Call | Online Classified Site
Free classified ads for cars, jobs, real estate, and everything else. Find what you are looking for or create your own ad for free
www.ads4call.com
www.ads4call.com
Free Classified Site | Online Ads for Call | Online Classified Site
Free classified ads for cars, jobs, real estate, and everything else. Find what you are looking for or create your own ad for free
www.ads4call.com
Looking Very Pretty.
BA 1st Year Time Table Check Here.
At precisely the exact same time, the gorgeous girls dedicate them to their own service and produce their Delhi trip sexy. Aside from offering a complete package of services, they also take care of all penny who call them pay per visit to their own places. Even when you're extremely new in this town and understand nothing of it, then they are prepared to look after you. Independent Escorts in Delhi
We are especially aware of the manner in which that each man has an other mind look into. Furthermore, hence, remarkable kind of youngsters will smother their sexual thirst. Likewise, subsequently, we have made our once-over with the goal that you will be overwhelmed in the right way if you visit us. There are no such female escorts in Delhi that you won't find in our summary. You ought to just to visit us.
Nehru place Escorts
The hectic world, a usual silhouette of wrinkled-faces and lack of time & good people make absolute absence of Love in our lives. Only a smile means to exist in the whole world bringing itself a Comet of Love. So it takes you believe onCall Girls in Vasant Kunj liable to fulfill your lives with real sense of love. Check our other Services...
Call Girls in Vasant Kunj
Call Girls in Vasant Kunj
Call Girls in Vasant Kunj
Call Girls in Vasant Kunj
Escorts in Connaught Place
Escorts Service in Gurgaon
Bcom RESULT 2020
Bsc Result 2020
BA Result 2020
I work in Guruji Educational is a Brand deal in online Education through different apps, prepared for the purpose of documenting professional development in the Education field such as
Logical Reasoning
English Grammar
English Stories
SSC CGL 2020
and follow our blogs @
english grammar in hindi
Education Blogs
Suman Dhawa
Guruji Educational
Aurangabad Escorts Service |
Aurangabad Escort Service |
Aurangabad Escorts |
Aurangabad Escort |
Escorts Service in Aurangabad |
Escort Service in Aurangabad |
Escorts in Aurangabad |
Escort in Aurangabad |
Aurangabad Call Girls |
Aurangabad Call Girl |
Call Girls in Aurangabad |
Call Girl in Aurangabad |
Female Escorts in Aurangabad |
Russian Escorts in Aurangabad |
Celebrity Escorts in Aurangabad |
Model Escorts in Aurangabad |
VIP Escorts in Aurangabad |
Aurangabad Call Gilrs Service |
Independent Escorts in Aurangabad |
Bahrain Escorts Service |
Bahrain Escort Service |
Bahrain Escorts |
Bahrain Escort |
Escorts Service in Bahrain |
Escort Service in Bahrain |
Escorts in Bahrain |
Escort in Bahrain |
Bahrain Call Girls |
Bahrain Call Girl |
Call Girls in Bahrain |
Call Girl in Bahrain |
Celebrtiy Escorts in Bahrain |
Model Escorts in Bahrain |
VIP Escorts in Bahrain |
Model Escorts in Bahrain |
Female Escorts in Bahrain |
High Profile Escorts in Bahrain |
coimbatore Escorts Service |
coimbatore Escort Service |
coimbatore Escorts |
coimbatore Escort |
Escorts Service in coimbatore |
Escort Service in coimbatore |
Escorts in coimbatore |
Escort in coimbatore |
coimbatore Call Girls |
coimbatore Call Girl |
Call Girls in coimbatore |
Call Girl in coimbatore |
Female Escorts in coimbatore |
Russian Escorts in coimbatore |
Celebrity Escorts in coimbatore |
Model Escorts in coimbatore |
VIP Escorts in coimbatore |
coimbatore Call Girls Service |
Independent Escorts in coimbatore |
coimbatore Escorts Service |
coimbatore Escort Service |
coimbatore Escorts |
coimbatore Escort |
Escorts Service in coimbatore |
Escort Service in coimbatore |
Escorts in coimbatore |
Escort in coimbatore |
coimbatore Call Girls |
coimbatore Call Girl |
Call Girls in coimbatore |
Call Girl in coimbatore |
Female Escorts in coimbatore |
Russian Escorts in coimbatore |
Celebrity Escorts in coimbatore |
Model Escorts in coimbatore |
VIP Escorts in coimbatore |
coimbatore Call Gilrs Service |
Independent Escorts in coimbatore |
manali Escorts Service |
manali Escorts |
Escorts Service in manali |
Escorts in manali |
manali Call Girls |
Call Girls in manali |
udaipur Escorts Service |
udaipur Escorts |
Escorts Service in udaipur |
Escorts in udaipur |
udaipur Call Girls |
Call Girls in udaipur |
haridwar Escorts Service |
haridwar Escorts |
Escorts Service in haridwar |
Escorts in haridwar |
haridwar Call Girls |
Call Girls in haridwar |
rishikesh Escorts Service |
rishikesh Escorts |
Escorts Service in rishikesh |
Escorts in rishikesh |
rishikesh Call Girls |
Call Girls in rishikesh |
mussoorie Escorts Service |
mussoorie Escorts |
Escorts Service in mussoorie |
Escorts in mussoorie |
mussoorie Call Girls |
Call Girls in mussoorie |
nainital Escorts Service |
nainital Escorts |
Escorts Service in nainital |
Escorts in nainital |
nainital Call Girls |
Call Girls in nainital |
guwahati Escorts Service |
guwahati Escorts |
Escorts Service in guwahati |
Escorts in guwahati |
guwahati Call Girls |
Call Girls in guwahati |
dehradun Escorts Service |
dehradun Escorts |
Escorts Service in dehradun |
Escorts in dehradun |
dehradun Call Girls |
Call Girls in dehradun |
kullu Escorts Service |
kullu Escorts |
Escorts Service in kullu |
Escorts in kullu |
kullu Call Girls |
Call Girls in kullu |
ajmer Escorts Service |
ajmer Escorts |
Escorts Service in ajmer |
Escorts in ajmer |
ajmer Call Girls |
Call Girls in ajmer |
viman-nagar Escorts Service |
viman-nagar Escorts |
Escorts Service in viman-nagar |
Escorts in viman-nagar |
viman-nagar Call Girls |
Call Girls in viman-nagar |
kishangarh Escorts Service |
kishangarh Escorts |
Escorts Service in kishangarh |
Escorts in kishangarh |
kishangarh Call Girls |
Call Girls in kishangarh |
This is truly informative and extremely helpful. Thank you for sharing. If you have time, visit our website too https://yhn707.com/ 에볼루션 카지노 사이트
محل قرار گیری خود زیبایی خاصی می افزاید
ونیز در کنار نوازش چشم و بر انگیختن حس زیبا شناسی فرد میتواند امنیت بالاتری نسبت به سایر
قيمت درب ضد سرقت
نیز فراهم آورد پس درب ضد سرقت ترک ضمن امنیت بالاتر ,زیبایی و شکیل بودن محیط رو نیز برای شما ایجاد می کند
در ضد سرقت
قیمت به مراتب بالاتری نسبت به درب های ضد سرقت ایرانی دارد و نمیتوان لوکس بودن درب ضد سرقت ترک را با انواع درب های ضد سرقت دیگر مقایسه کرد و جا دارد در اینجا به این نکته توجه داشته باشیم
If you are not having sensual and excited sex with your love partner, you are not satisfying your urges. I laid the foundation of this High Profile Jaipur Escorts Service with honesty, sincerity, dedication, commitment, and quick response as one of the few basic principles as the foundation pillars of this organization.
Jaipur Escorts
Mumbai Escorts
Goa Escorts
Hyderabad Escorts
Awesome information! Thanks for sharing!
https://peatix.com/user/6247836/
Independent Bangalore Escort
در درب ضد سرقت دولنگه
درب لابي
هتر است از پاشنه سنگی برای درب استفاده شود که هیچگونه ورودی از زیر درب انجام نشود
این نوع
درب ضد حريق
با یرآق آلات آنتی پنیک مختلف با برندهای و داف و کاله ترکیه ساخته می شود
http://vipmodel-escorts.com/
http://vipmodel-escorts.com/jodhpur-escort-service-call-girls-in-jodhpur-7665166866/
http://vipmodel-escorts.com/ajmer-escorts-service-7665166866-call-girls-in-ajmer/
The client will feel too pumped-up on merely going through profiles of the hot females escorts in Mount Abu. Not to forget about the special categories that also is the result findings of the above-mentioned keyword.
I am planning to start blogging and I really love your content. Your work has really peak my interest. I am going to bookmark your website and keep checking for new update. Please check our site too. https://yhn876.com 카지노사이트
Stock Homes Institute Best Stock Market Training Institute In Indore.Join To Get Affordable Courses & Get NISM Certification Diploma
Are you looking for CALL GIRLS in Jaipur and escort service? independent call girls in Jaipur.
https://escortservicesinjaipurcity.com/
https://escortservicesinjaipurcity.com/escort-service-in-jaipur/
https://escortservicesinjaipurcity.com/jaipur-escorts/
https://escortservicesinjaipurcity.com/jaipur-escort-service/
https://escortservicesinjaipurcity.com/jaipur-call-girls-service/
https://escortservicesinjaipurcity.com/contact-us-jaipur-call-girls/
Dofollow Click Here
Thanks for sharing this nice piece of information. I really loved reading it. In case you want to read mine kindly
click bellow:-
Escort services in Jaipur
Escort services in Jaipur
Escort services in Jaipur
Escort services in Delhi
Escort services in Guwahati
Escort services in Guwahati
Escort services in Guwahati
Escort services in Guwahati
This blog helps me a lot.Please make time to read, this may help you.
Click the link below...
https://pmx7.com/ 안전놀이터
यूनिराज बीए प्रथम ईयर रिजल्ट - नाम वाइज
MG Road call girls ##
Russian escorts bangalore##
whitefield escorts ##
Indiranagar Escorts ##
Escorts in Electronic City ##
Escorts Marathahalli ###
KR Puram escorts ##
majestic escorts ##
koramangala escorts ##
Hire ravika kapoor Vip Jaipur Escorts for extreme pleasure and
memorable experience with Independent Escort in jaipur
and high profile female models
https://escortservicesinjaipurcity.com/
https://escortservicesinjaipurcity.com/escort-service-in-jaipur/
https://escortservicesinjaipurcity.com/jaipur-escorts/
https://escortservicesinjaipurcity.com/jaipur-escort-service/
https://escortservicesinjaipurcity.com/jaipur-call-girls-service/
https://escortservicesinjaipurcity.com/contact-us-jaipur-call-girls/
Jaipur Escort
bitsourceit
I wanted to leave a little comment to support you and wish you a good continuation. Wishing you the best of luck for all your blogging efforts. Visit our website too. 바카라사이트
https://game79zone.com 바카라사이트
Differences Between Java and JavaScript
Best Seo Company in Lahore
Best Seo Company in Lahore
Best seo company in lahore
I am an Escort in City and I provide Escort services independently. I serve my Escorts Service in City to high society customers, business tycoons, and a few well-known businessmen also. I only go and respond only to genuine customers who really look interested in me. So just make the final decision in making appointments. All my appointments are in advance so just Call or Whatsapp me for prior booking.
Moga Escorts $$
Hoshiarpur Escorts $$
Gurdaspur Escorts $$
Bathinda Escorts $$
Amritsar Escorts $$
Jalandhar Escorts $$
Ludhiana Escorts $$
Rajpura Escort Service $$
Batala Escorts $$
This is really helpful and informative. Please come and visit our website. Thank you! Have a nice day!
카지노사이트
https://yhn777.com 카지노사이트
Hello.
I always see and feel a lot from you.
Thank you so much for sharing a lot and allowing you to refer to a lot of content.
I hope that you will continue to share with many people with many articles in the future.
Please visit our website :)
카지노사이트
https://yhn777.com 카지노사이트
Great post!!
men's clothing Dubai
women online shopping Dubai
Kids Shoes Dubai
Online Shopping for Women, Men, Kids Fashion & Unisex Dubai
Online Shopping for Men Dubai
find hot blr escorts Blr call girls
I concur with your conclusions and will eagerly look forward to your future updates. Just wanna recommend our good and fun site, just click the link below: 카지노사이트
Https://yhn876.com 카지노사이트
We have calls available in the best of categories, according to our need, we are waiting for you, erotic and beautiful Pushkar Escort Service, you can come on our website and contact us 24x7 hours anytime Pushkar Escorts Service.
You can state they are in a similar circumstance sitting tight in the city for you to drop by and protect them from their dejection.
Escort Lebanon
Escorts Lebanon
Escort in Lebanon
Escorts in Lebanon
Lebanon Escort
Lebanon Escorts
You can state they are in a similar circumstance sitting tight in the city for you to drop by and protect them from their dejection.
Escort Lebanon
Escorts Lebanon
Escort in Lebanon
Escorts in Lebanon
Lebanon Escort
Lebanon Escorts
You can state they are in a similar circumstance sitting tight in the city for you to drop by and protect them from their dejection.
Escort Lebanon
Escorts Lebanon
Escort in Lebanon
Escorts in Lebanon
Lebanon Escort
Lebanon Escorts
iam priyatakur bangalore living iam happy to serve my service to all my customers i know how to satisfy them
do you need my bangalore escorts service contact here
Bangalore escorts agency
VIP Escorts in Karachi
Vip Escorts Murree
Blue Escorts in Rawalpindi
Thanks For Sharing Your Content and Designs. Keep Doing Good Work. I Hope You Will Check our Websites.
" luxury car service San Diego"
On the off chance that you are scanning for escorts in Beirut so as to make the most of your best time, just pursuit on the web according to your supported territory. You will get a lot of output and you can pick any of them and view a rundown Beirut escort's profile.
Escorts in Lebanon | Escorts Lebanon | Lebanon Escorts
Lebanon Escort
Escorts in Lebanon
Escort in Lebanon
People want to enjoy their bedroom in such a way that every time there is a new way of excitement which makes that moment too much effective and memorable.
Escort Lebanon
Escorts Lebanon
Lebanon Escorts
Lebanon Escort
Escorts in Lebanon
Escort in Lebanon
Our Escorts Are Professional
You will proceed in haven together with me. Only allow me to understand your appetite and realize the result.
I provide fine french, deepkissing, fine oral BJ without condom, however sex with condom, Girl on top, Doggie, 6 9, Finest girl friend exprence,face sitting, Love talking and spending very good time together,everything but no anal, no cim. Call us 8239556555.
https://www.nishasharma.in/
Post a Comment